When a user first signs into SW2 one of this first things they will want to do is set up their dashboard to meet their requirements. A user dashboard is made up of various Widgets that all contain different data regarding projects a user has access to. Each user has the ability to show or hide these widgets based on what information is important to them.
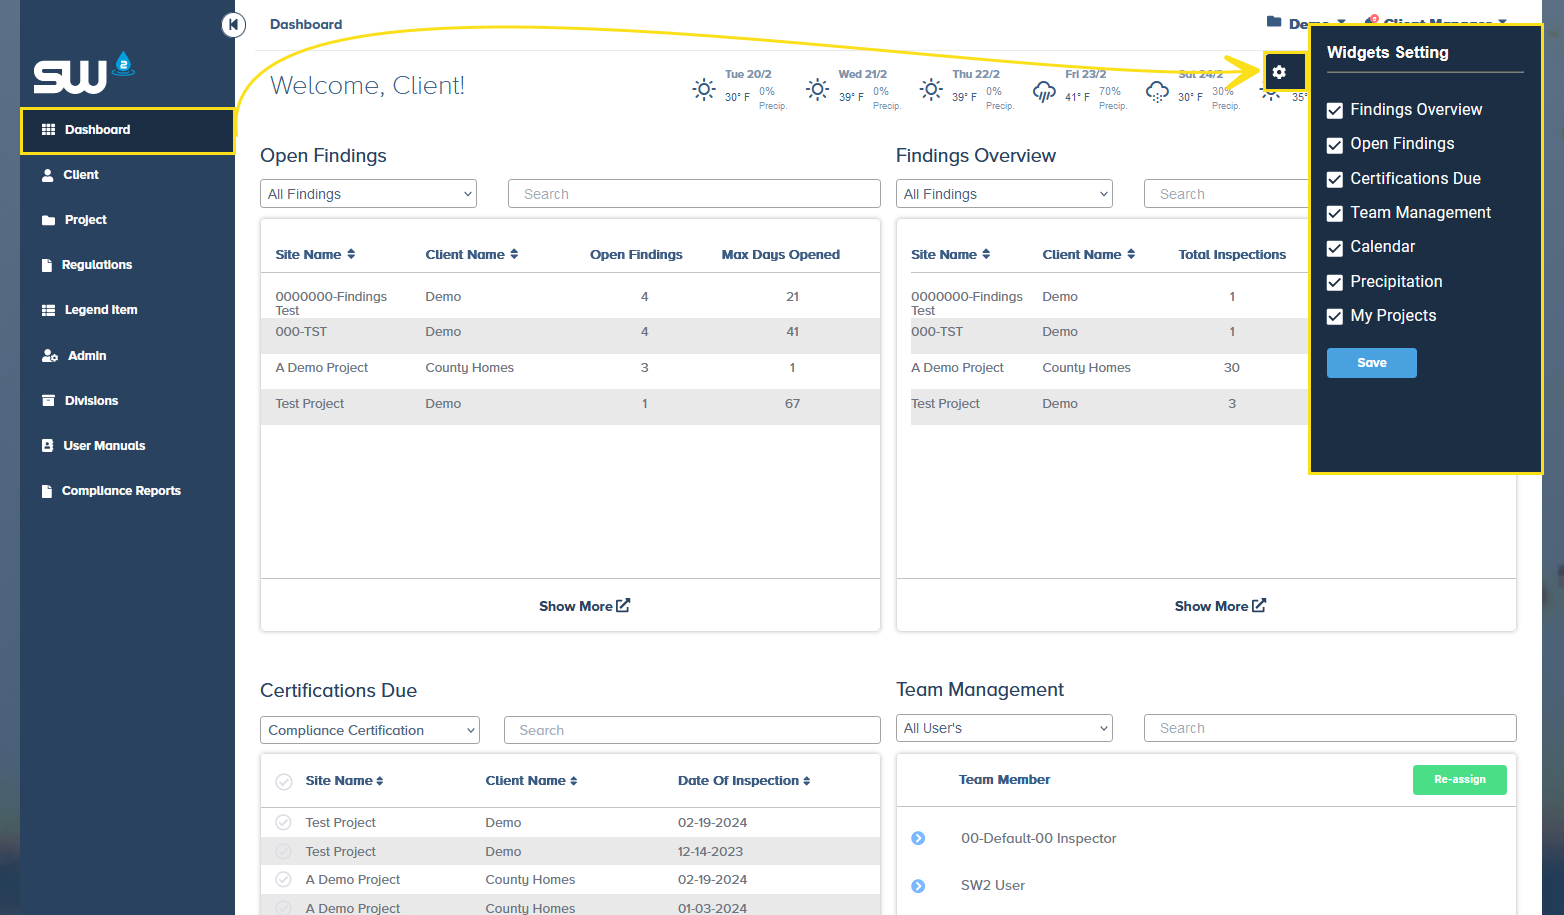
To show or hide widgets click on the dashboard menu button that shown as a gear icon. Simply check widgets that should be shown and deselect widgets that should be hidden. Make sure to save you preferences before minimizing the dashboard menu.
Once a user has identified and selected the widget(s) to be used it is now time to arrange them in a chosen order. Users can click and drag each widget to appear on top, bottom, right or left of view. The show more and show less buttons will either expand or minimize the view of each widget.
My Projects
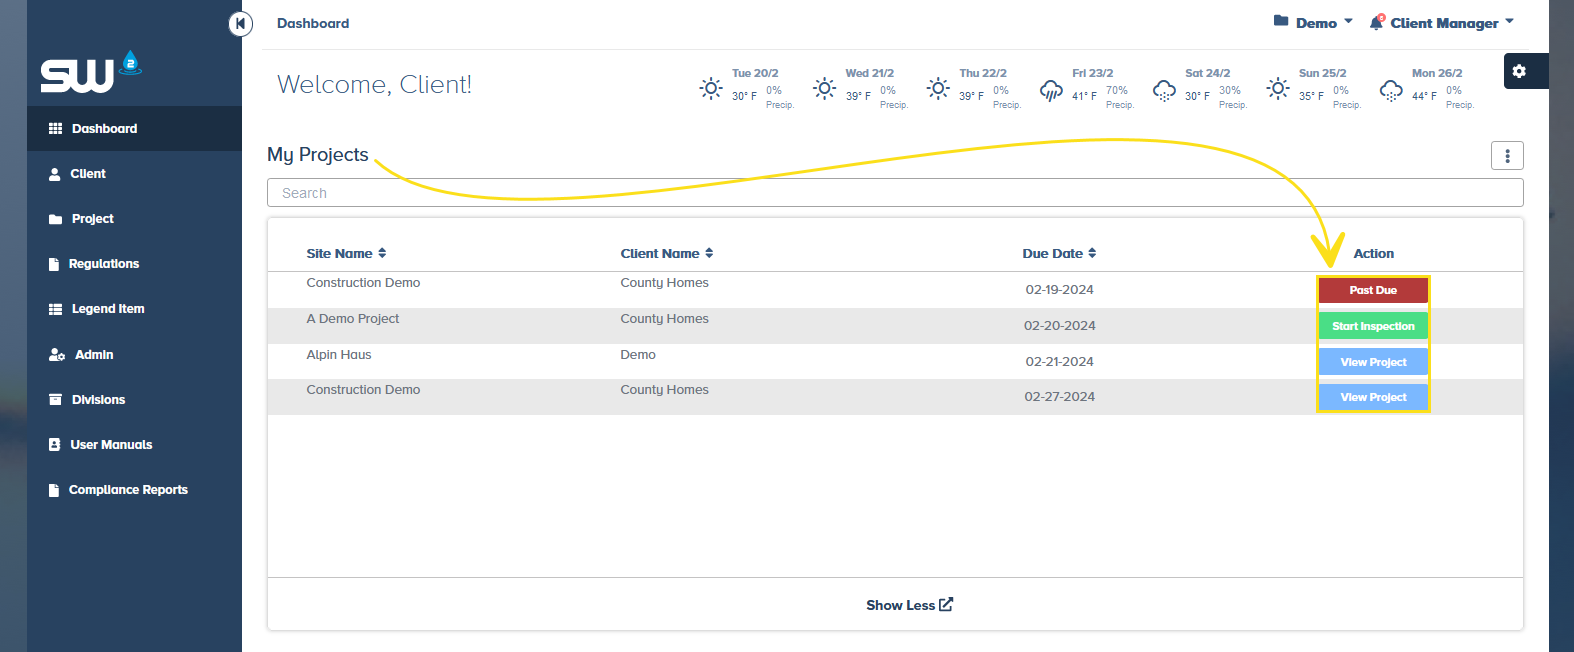
The My Projects widget will contains three different options. An important feature to this widget is that even if a user is associated with multiple accounts and or divisions, all projects the user is associated with, no matter where they are stored, will appear here. To change to a new view within this widget simply access the widget menu located in the top right corner.
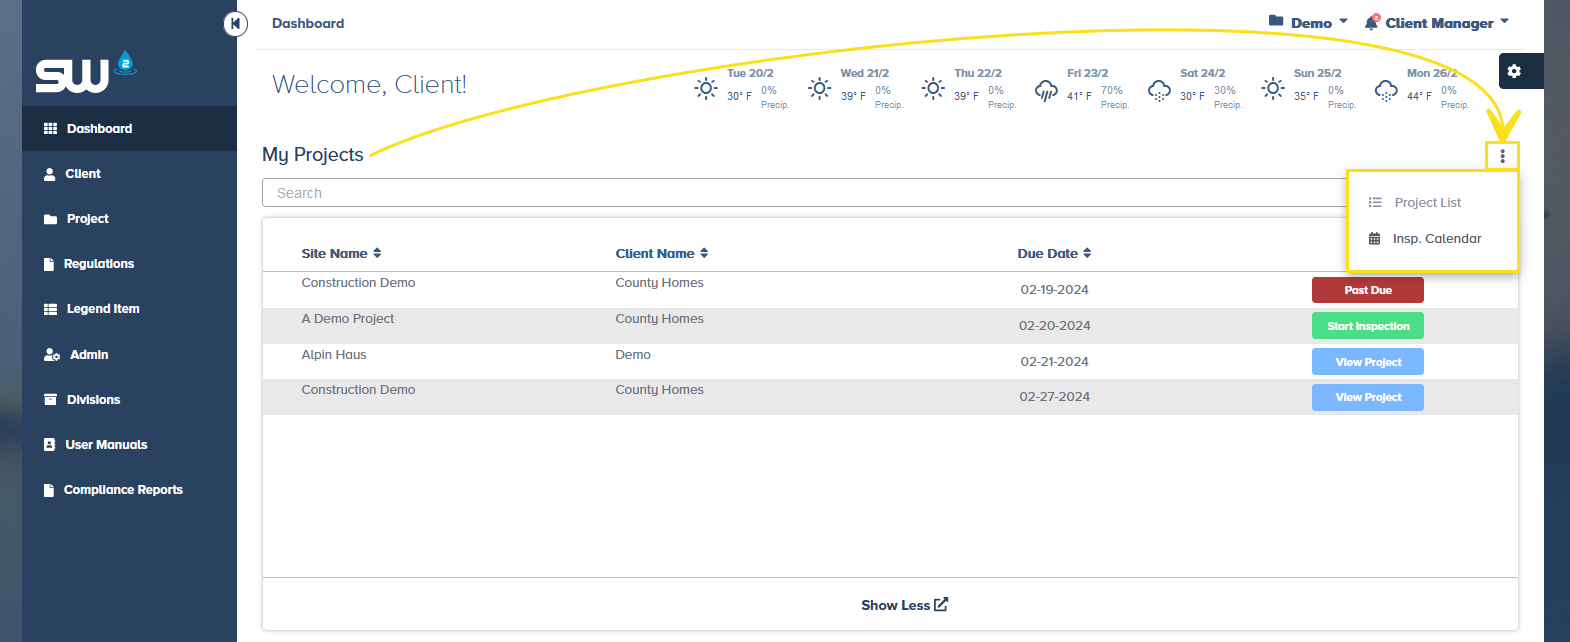
The Inspections Due view will show a list of all projects where the user is assigned as the primary inspector. This list will be in chronological order where the next due inspection will appear at the top and the last due inspection will appear at the bottom. Each inspection row will have and a corresponding action button. Note that the user must be assigned as the primary inspector for projects / inspections to appear in the view.
- Past Due – will appear in red when an inspection was not completed for that project on the specified due date.
- Start Inspection – Will appear in green for inspections that are due today
- View Project – Will appear in blue for all future inspections and is there to provide quick access to each project.
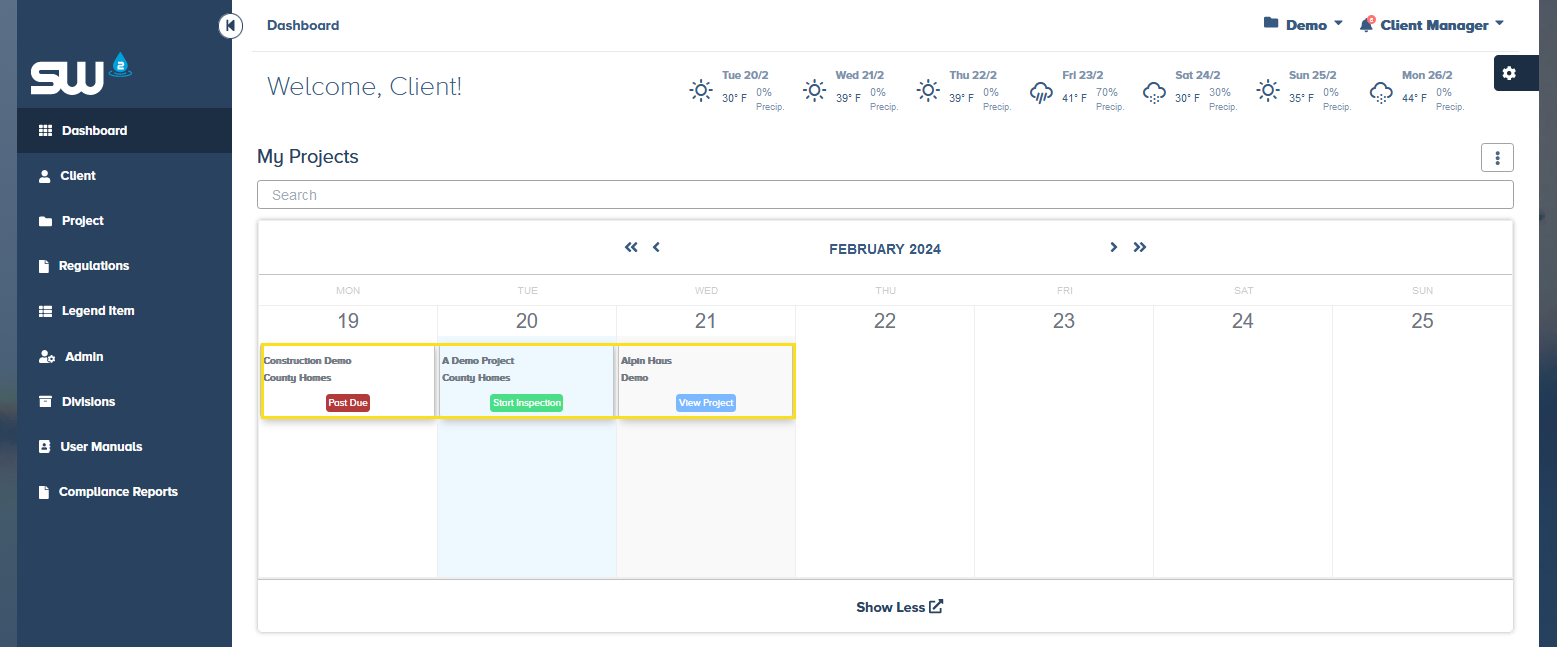
The Inspection Calendar view will sow all inspections due for the current week. Each card represents an project where an report is due and will each have an action button included. Note that the user must be assigned a the primary inspector for projects / inspections to show in this view.
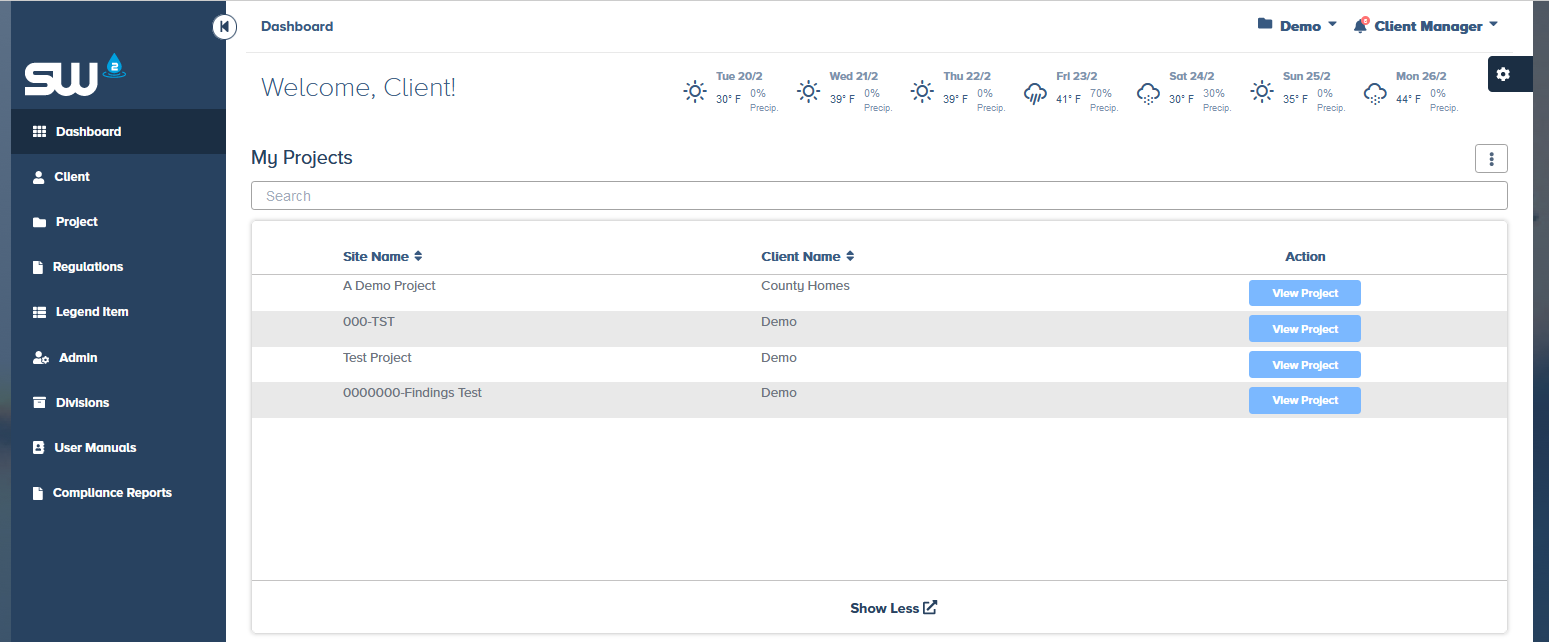
The Project List view will show a list of all projects a users has access to even if that user is not assigned as the primary inspector. Each user will be be able to search for and isolate a specific project using the search bar and may also sort the Site Name and Client Name columns by alphabetical order.
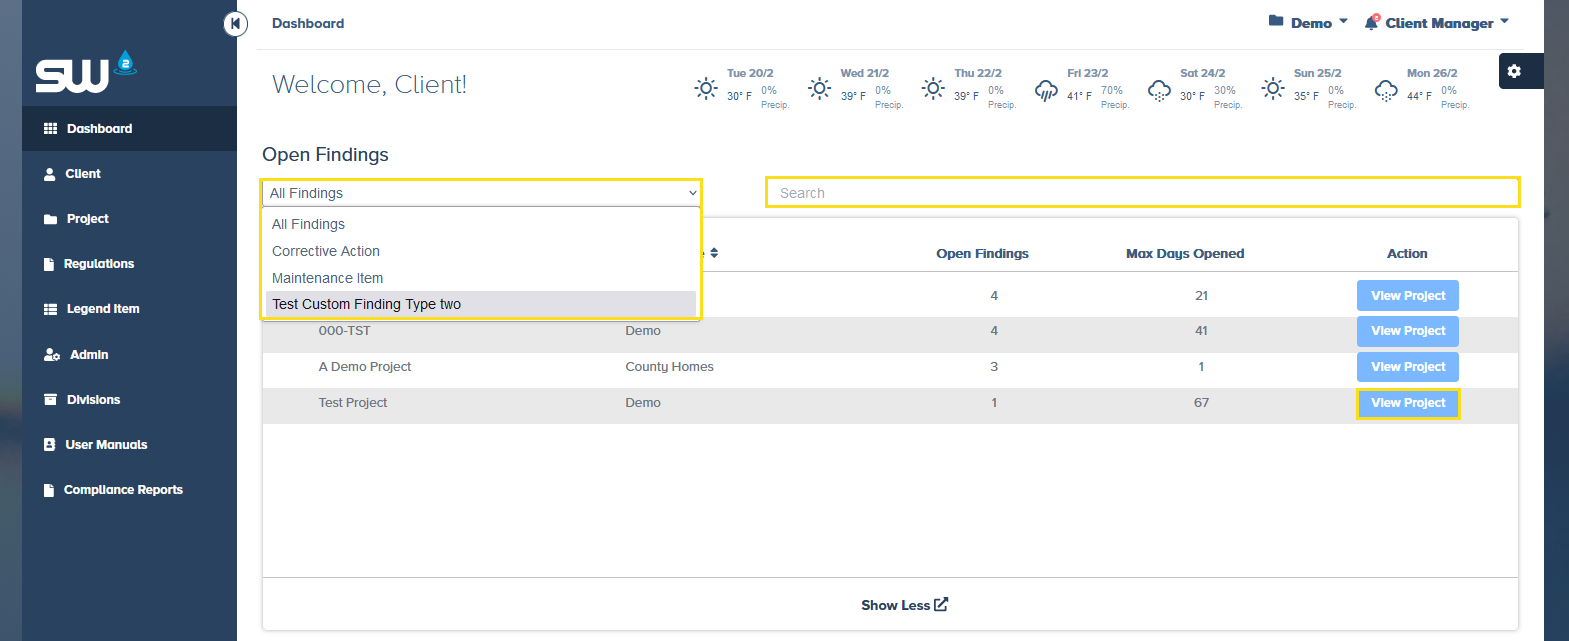
Open Findings
The Open Findings widget is a great tool to keep informed on the status of findings for any and all projects. This widget will identify:
- The current number of open findings for each project.
- The age of the oldest finding for each project.
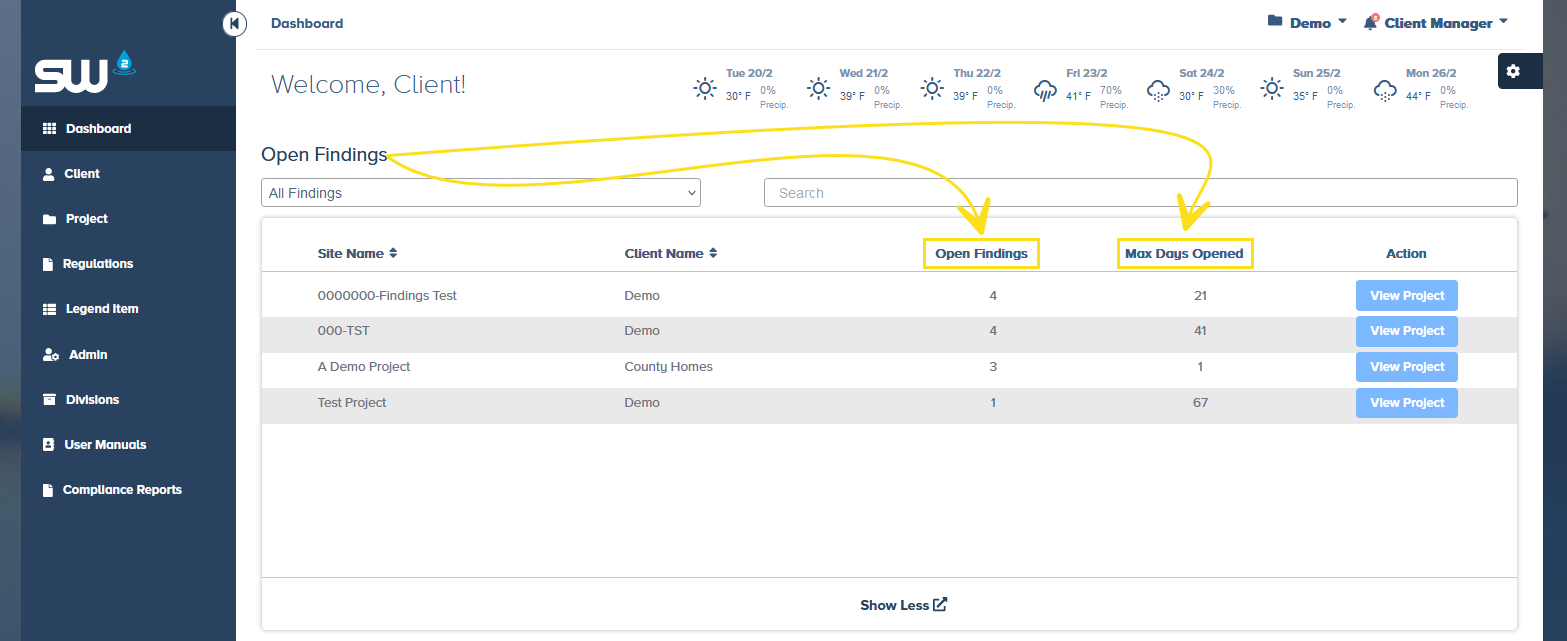
Users also have the ability to search for / isolate a specific project using the search bar AND can filter the results based on Finding Type. This is a great option if a user is only interested in see if any corrective action finding types are open. One thing to note is that if an organization decides to create custom finding types those option will become available here as well.
Each project row comes with an action button to View Project which provides a quick link to that projects finding details.
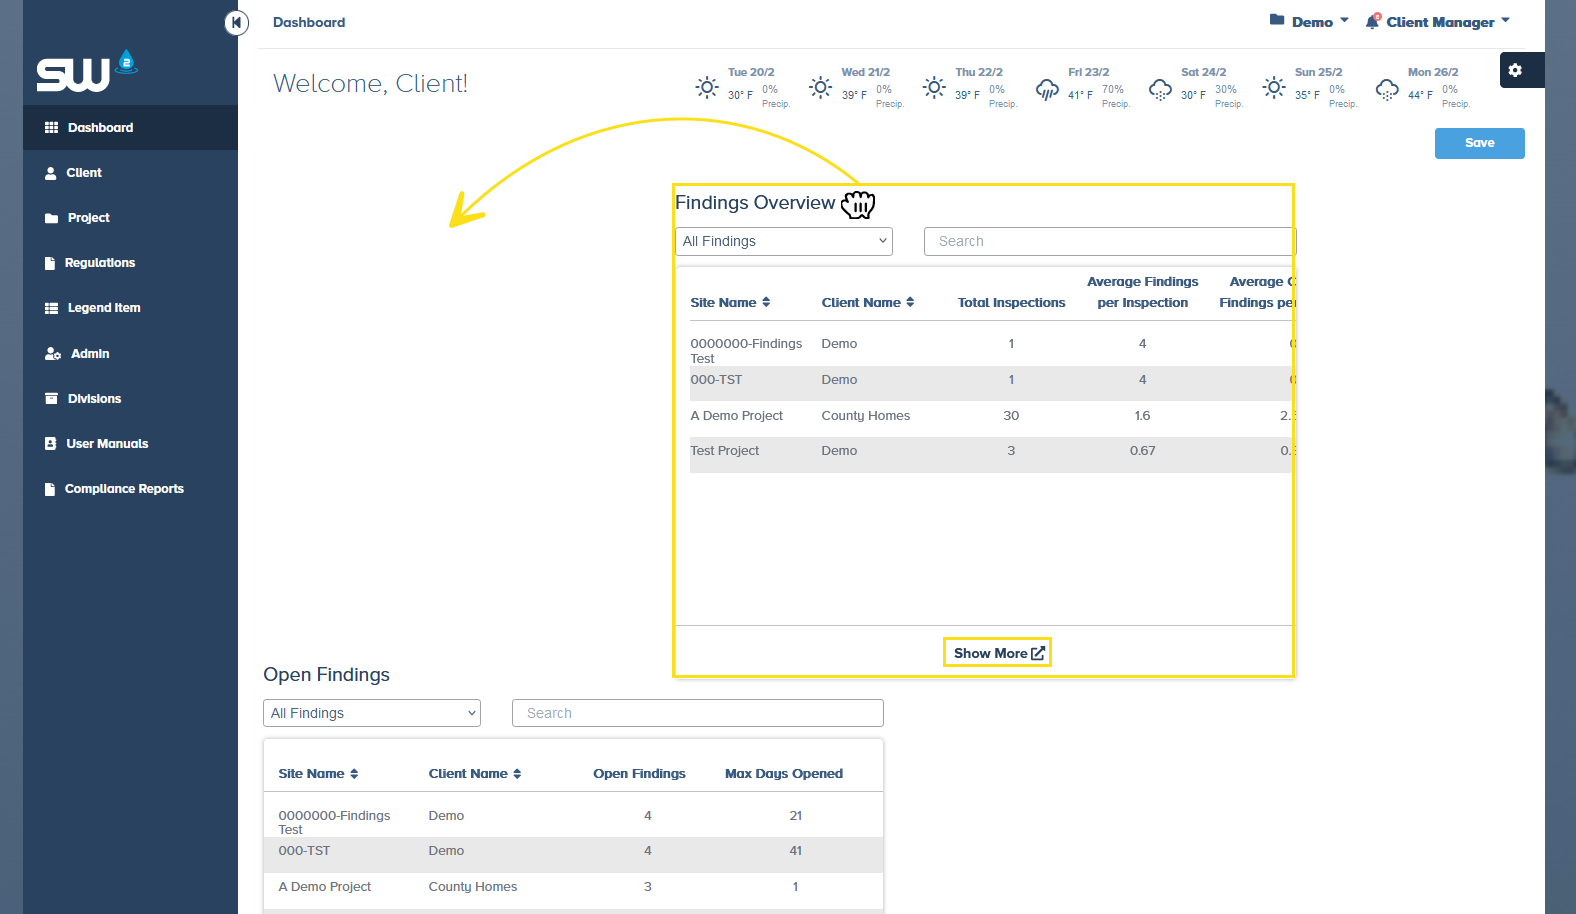
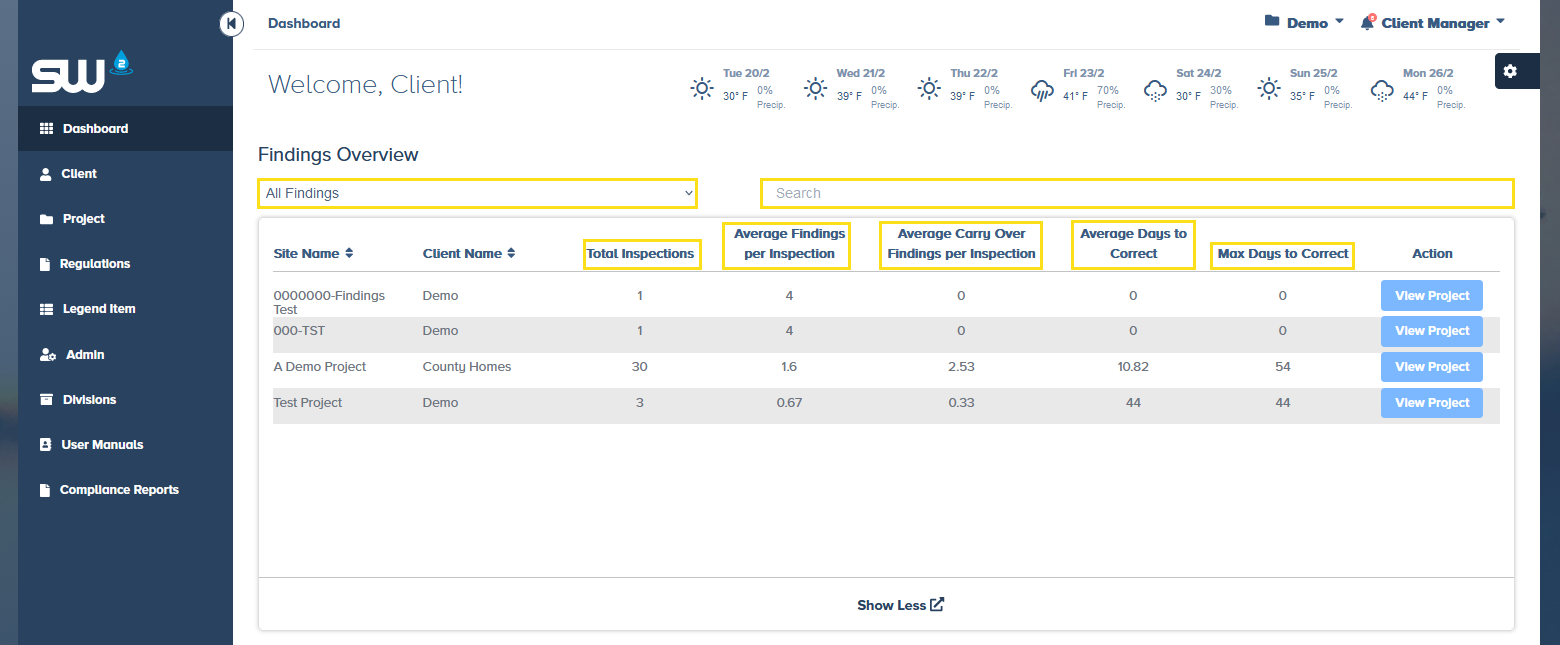
Findings Overview
The Findings Overview widget goes into a bit more details regarding the findings for each project. Like the Open Findings widget users can sort between different finding types to view their associated data. This widget contains the following data points:
- Total Inspections – Shows the total number of inspections that have be performed.
- Average Findings per Inspection – Shows the average findings that are identified during each inspection.
- Average Carry Over Findings per Inspection – Shows the average number of findings that were not completed before the next inspection was started OR for findings that have a completed date that surpasses the following inspection’s date.
- Average Days to Correct – This data point uses the date that findings are initiated, or created, against the date findings are marked as completed to get the average time it take for findings to be completed or addressed.
- Max Days to Correct – Shows the data point on the finding that took the longest to be marked as complete.
Certifications Due
The Certifications Due widget shows a list of unsigned inspection reports for projects that a user has access to. This list, by default, is sorted first by Client Name and then by Date of Inspection. Users have the option to search for and isolate a specific project to easily find specific reports. This widget also provides the ability for users to certify or sign reports directly from there dashboard.
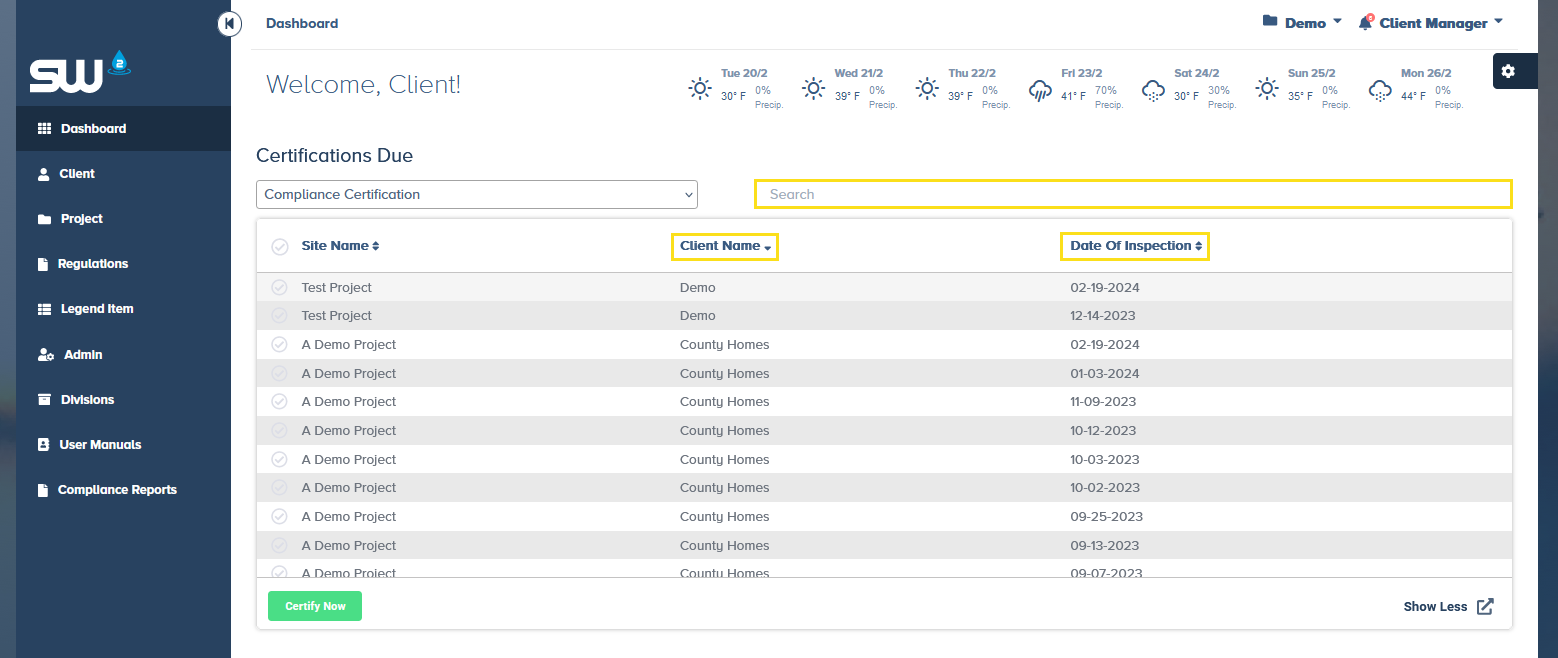
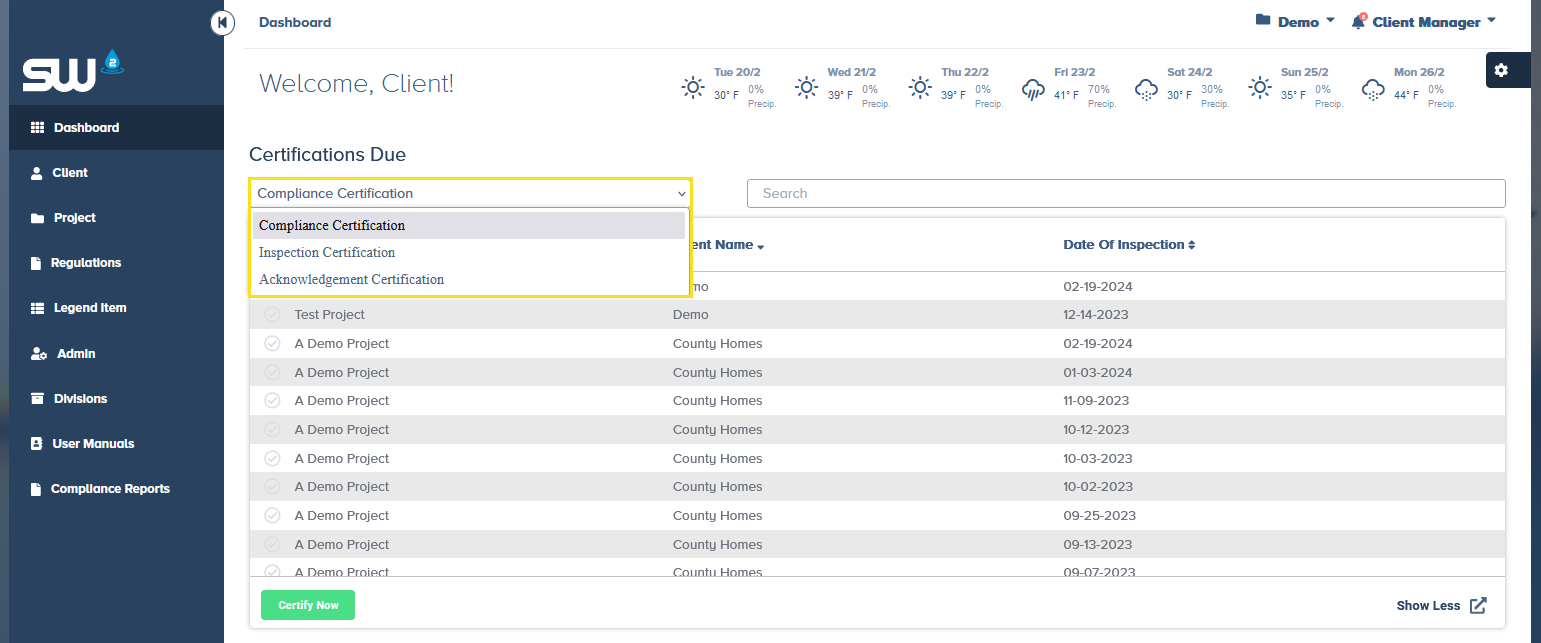
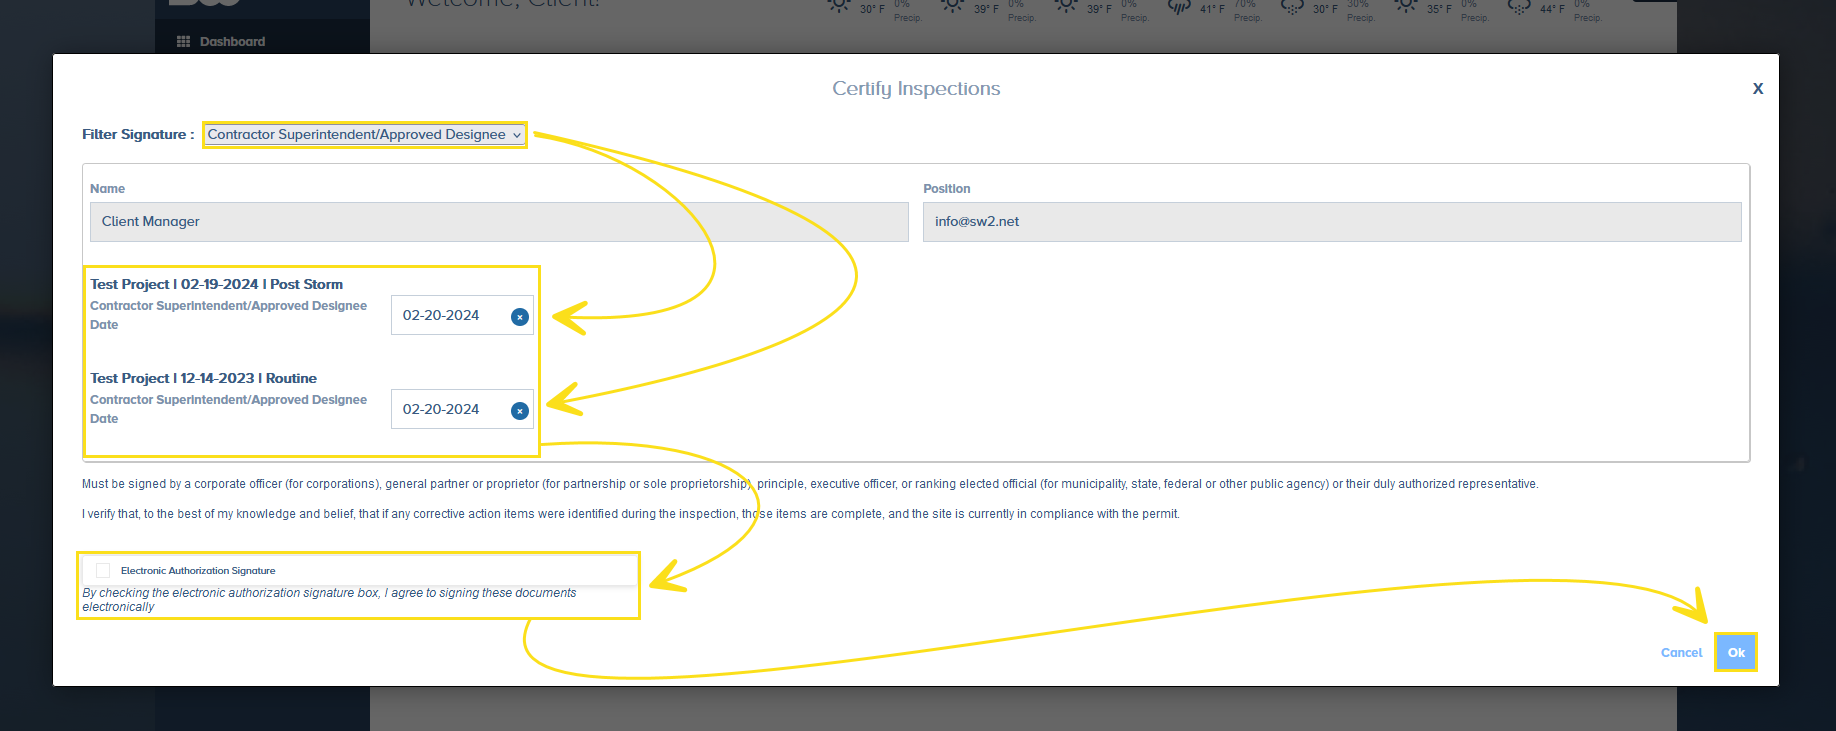
Forms can often have more than one certification / signature area or group. Users can easily isolate available signature groups by utilizing the drop down located in the top left corner of the widget. SW2 allows for three different types of groups:
- Inspection Certification – Is the certification type that is signed by the inspector up completing a report. Some report have more than on inspection certification line available which is where this sorting capability comes in handy.
- Acknowledgment Certification – Some forms require a secondary signature that is used to show that another user has read and acknowledge the report. If your form(s) have this certification type included then this sorting capability is useful for users who need to only sign that specific certification type.
- Compliance Certification – The compliance certification is the most common secondary signature often required.
To proceed with signing reports shown, first use the select icons, located to the left of each row and then click Certify Reports.
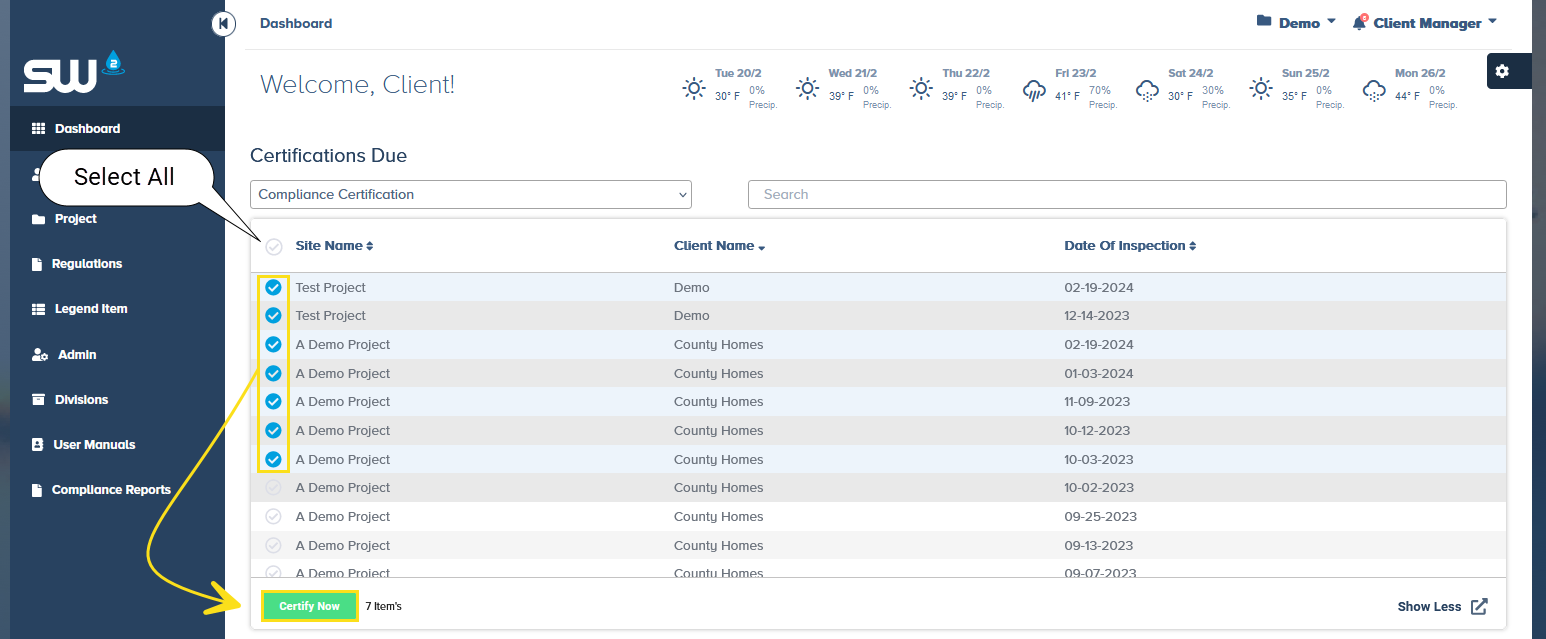
Once Certify Now is selected a pop up will appear listing out all of the signature lines available on that report. In some cases forms will have more than one signature line withing a certification group (i.e. inspection, acknowledgement, compliance). Within this pop up there is a sub-filter that allows users to isolate by signature line. This sub-filter is to be used to prevent users from accidently signing the wrong line on a report.
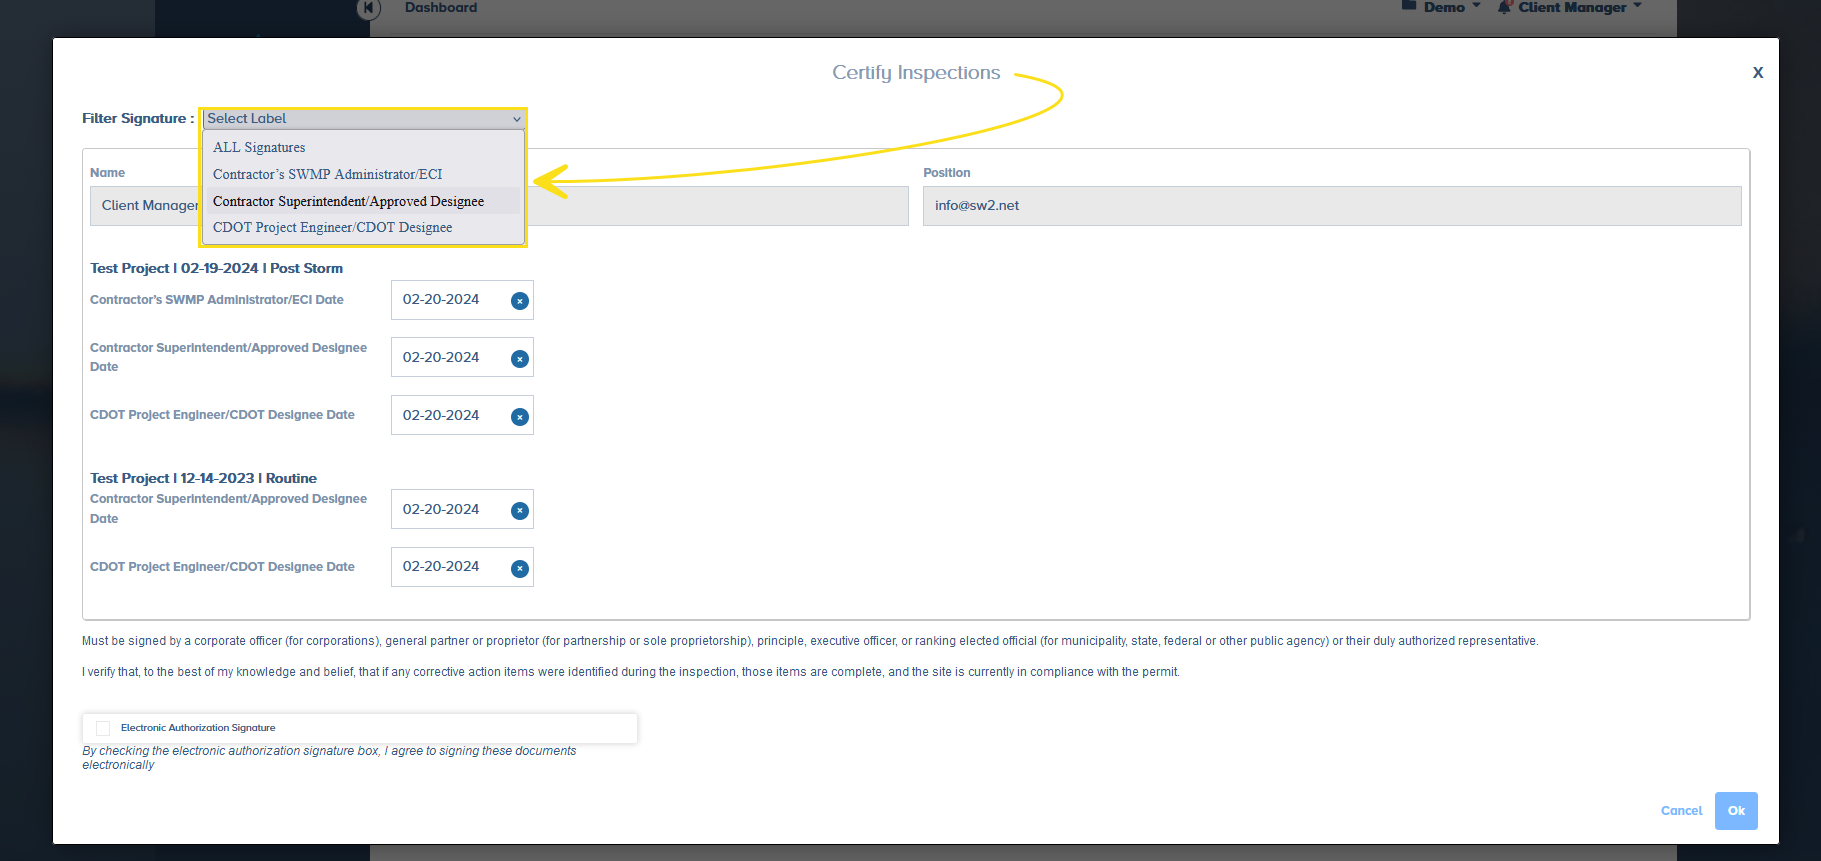
Once the user is ready to sign the selected reports make sure the following information is confirmed:
- Project Name
- Date of Inspection
- Signature Line’s Label
- Date of Signature
Once all information has been reviewed and confirmed, simply select the Electronic Authorization Signature box and click Ok to finish.
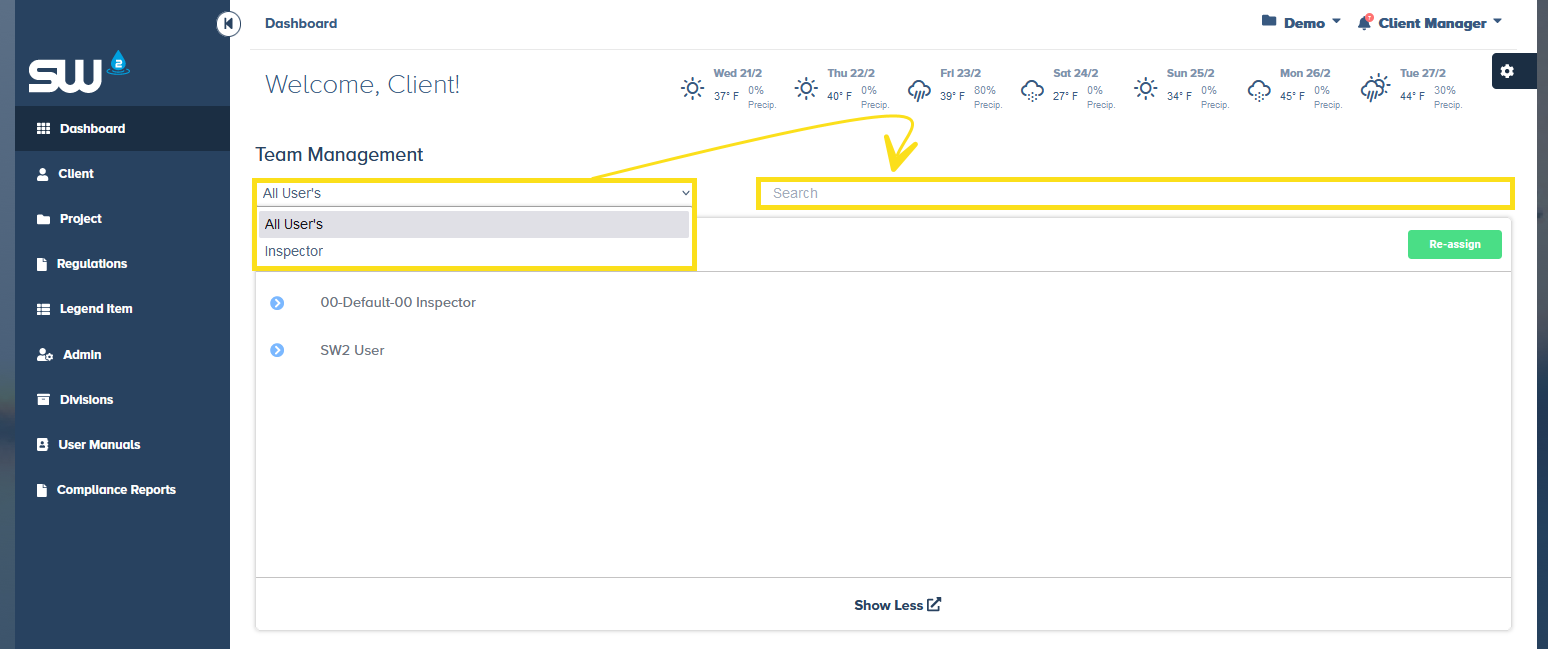
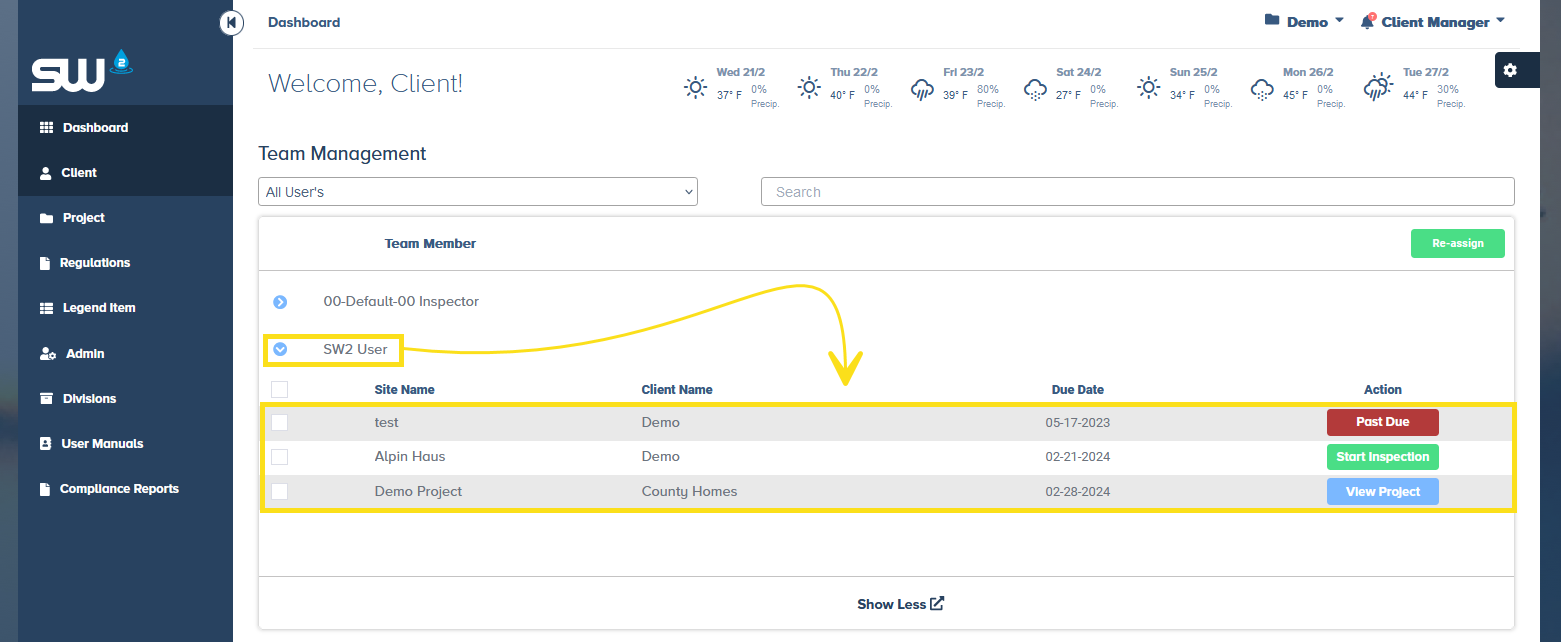
Team Management
The Team Management widget is a tool for managers and other users to keep track of other users projects and inspections due. In this widget a user will see a list of users that are either assigned to them, through Admin page. Admin and Client Manager user roles will see all inspectors in due to their permission level.
Within this widget users can sort / isolate the following:
- User Role Type
- Project and or Client Name
- Inspector Name
Each user name shown is a drop down that will list out all inspections, assigned to that user, in chronological order. Each inspection that is listed will have one of the following action buttons available.
- Past Due – will appear in red when an inspection was not completed for that project on the specified due date.
- Start Inspection – Will appear in green for inspections that are due today
- View Project – Will appear in blue for all future inspections and is there to provide quick access to each project.
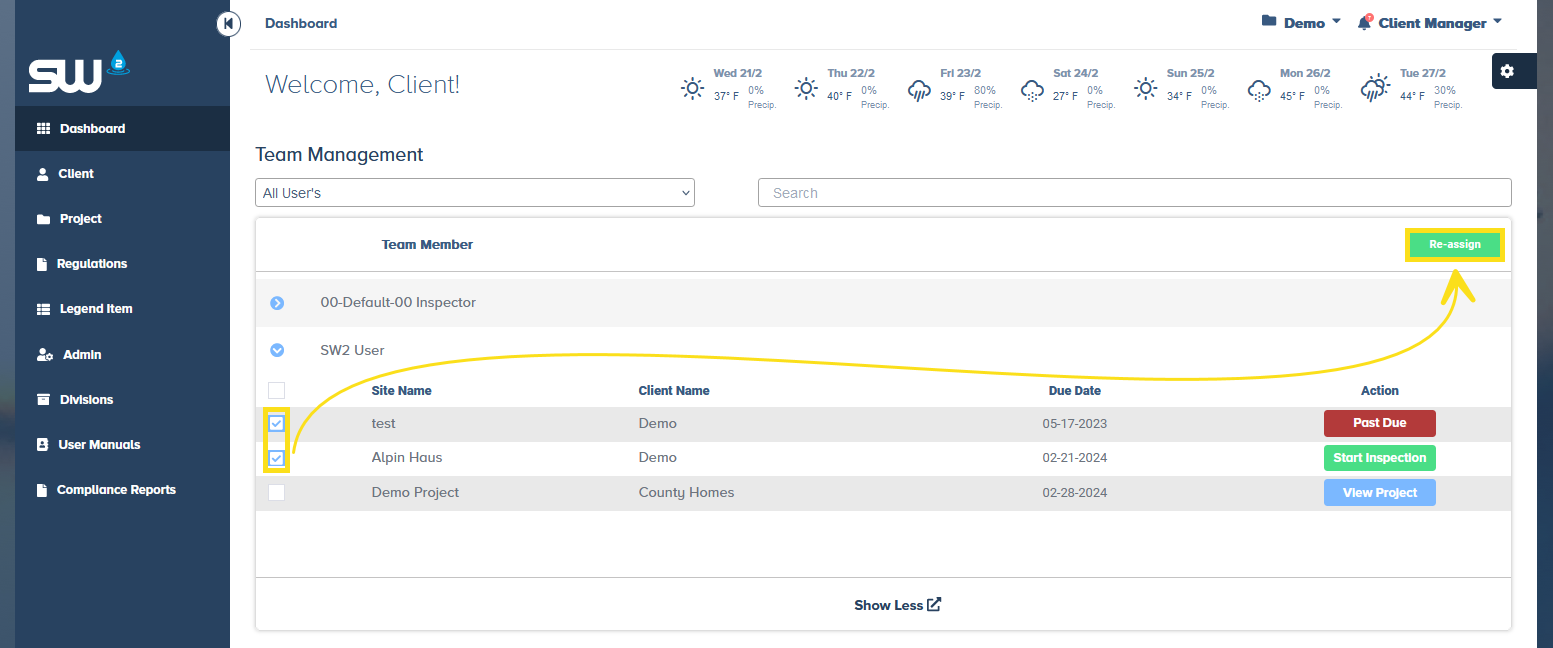
User can also use this widget to re-assign projects from one inspector to another. To do this simply select one, multiple or all projects under an inspector and click the Re-assign button.
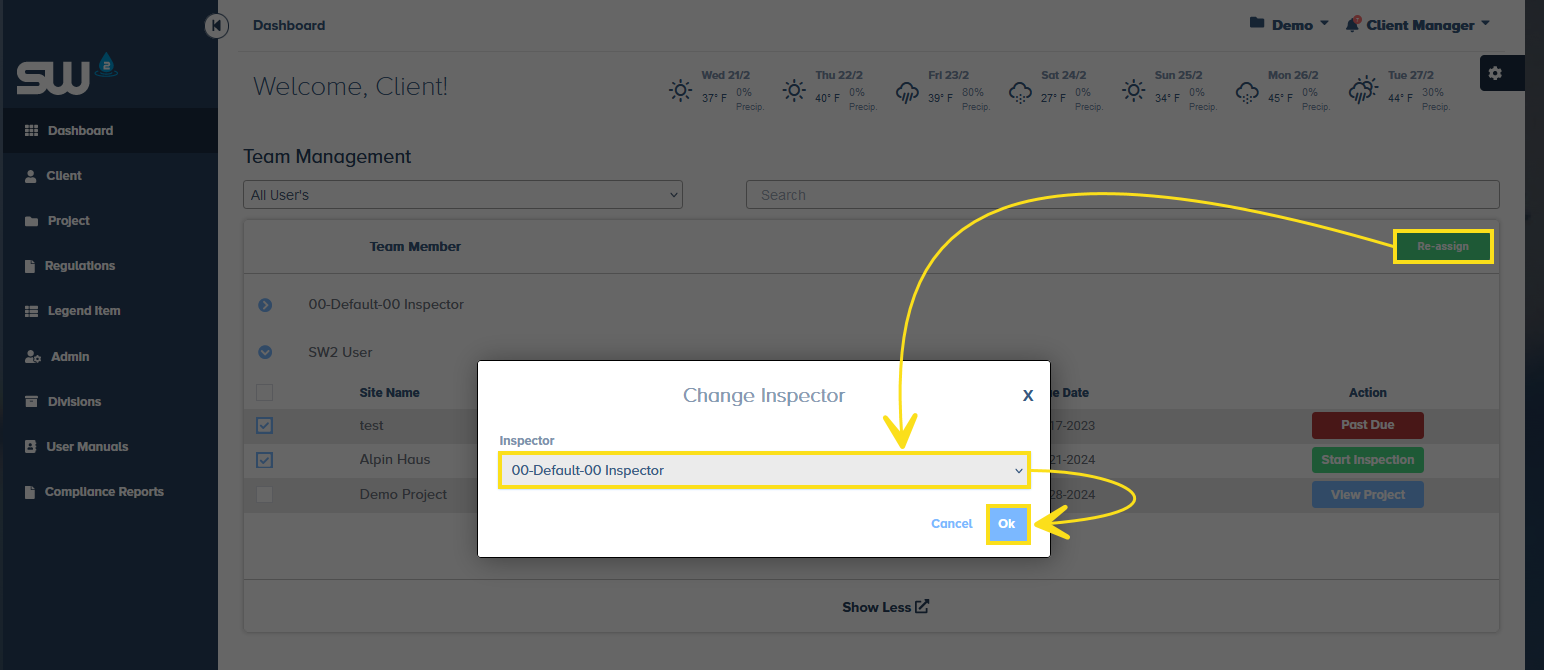
After the Re-assign button is clicked a pop up will appear where a new inspector will be chooses. To complete the re-assignment process simply click Ok.
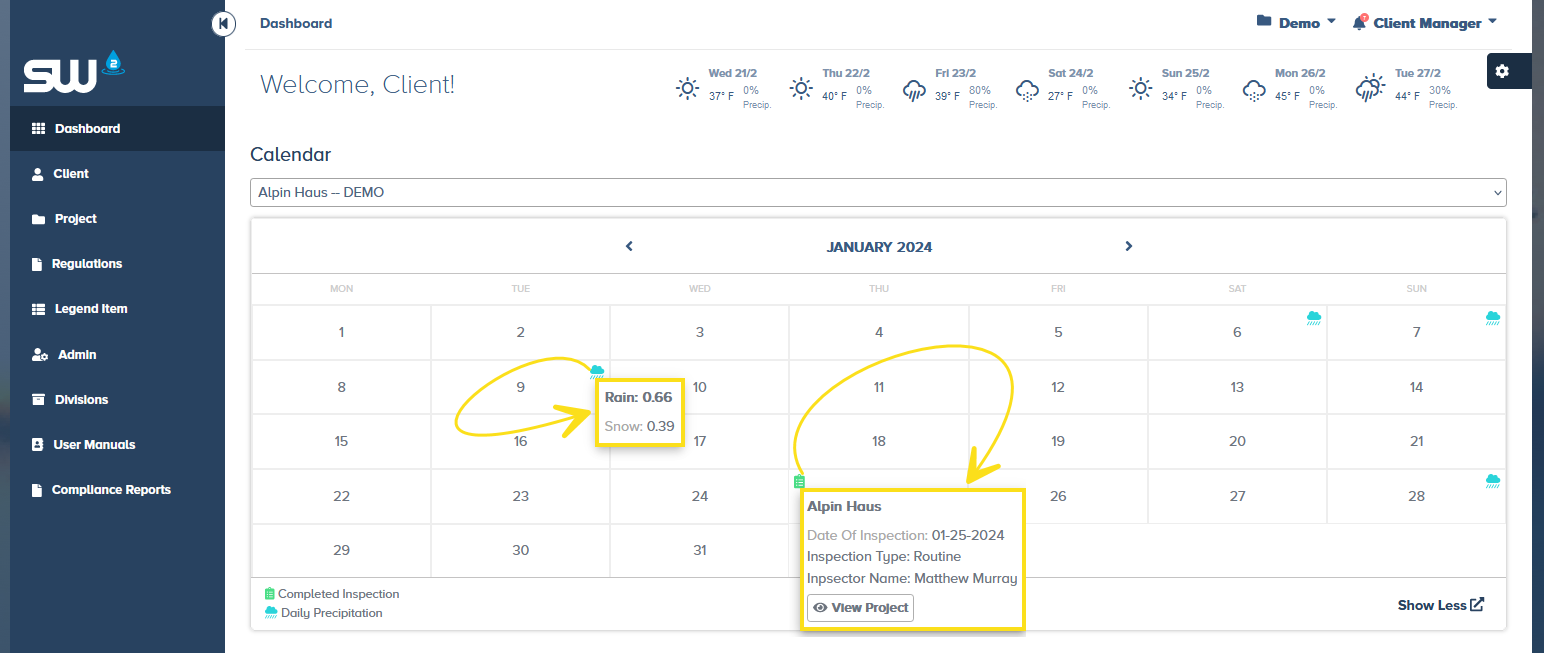
Calendar
The Calendar widget contains historical data on when inspections have been submitted and when measurable precipitation has occurred at each of your projects. User need to have been given access to projects for those to appear as options in the project selection drop down.
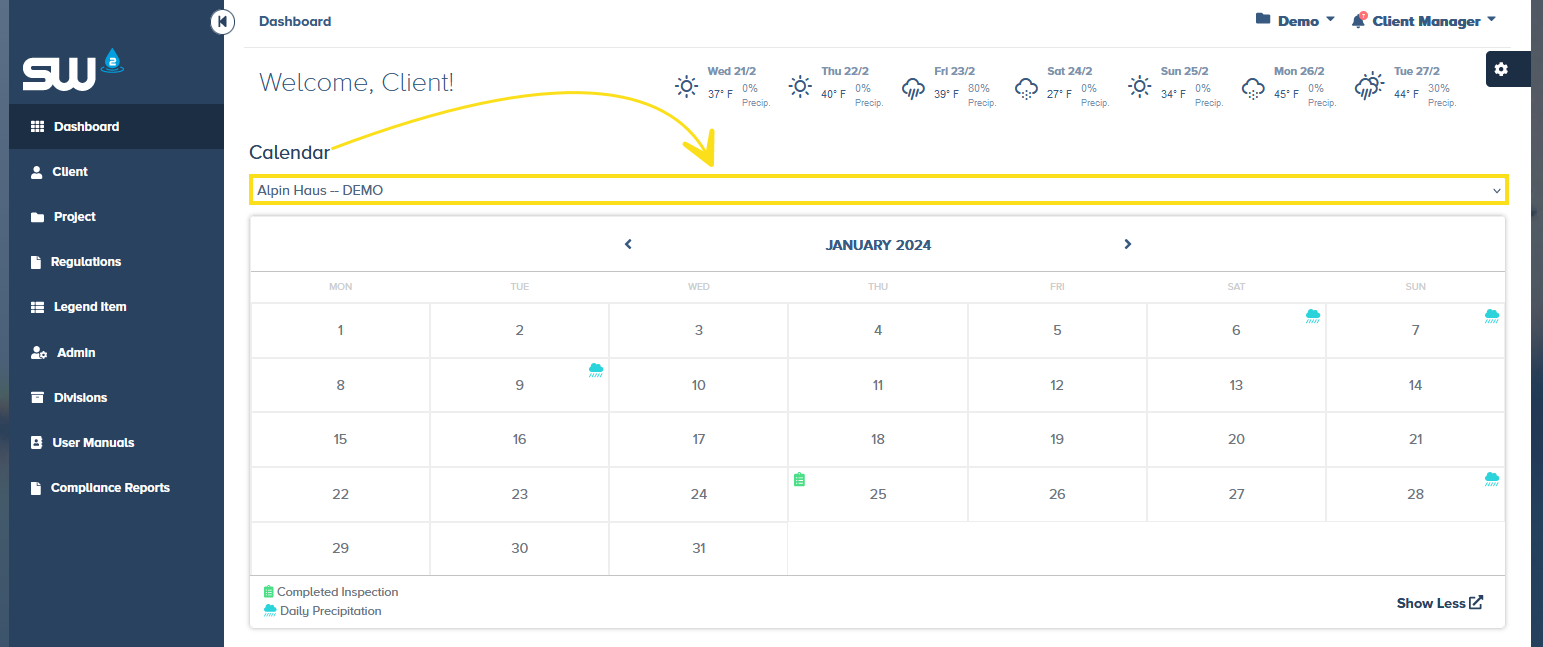
Once a project has been selected you will notice that there are two icons available, a user can click on either icons on the calendar to reveal additional information.
- Green Inspection Icon – this icon will appear on days were an inspection has been submitted under the selected project. When a user clicks on this icon they will be able to see:
- Project Name
- Date of Inspection
- Inspection Type
- Inspector Name
- View Project Button
- Blue Cloud / Rain Icon – this icon will appear when precipitation that has met or surpassed the user set threshold. Note that precipitation tracking must be turned on at the client and project level for data to populate here. When a user clicks on this icon they will see:
- Total Rain Accumulation (inches)
- Total Snow Accumulation (inches)
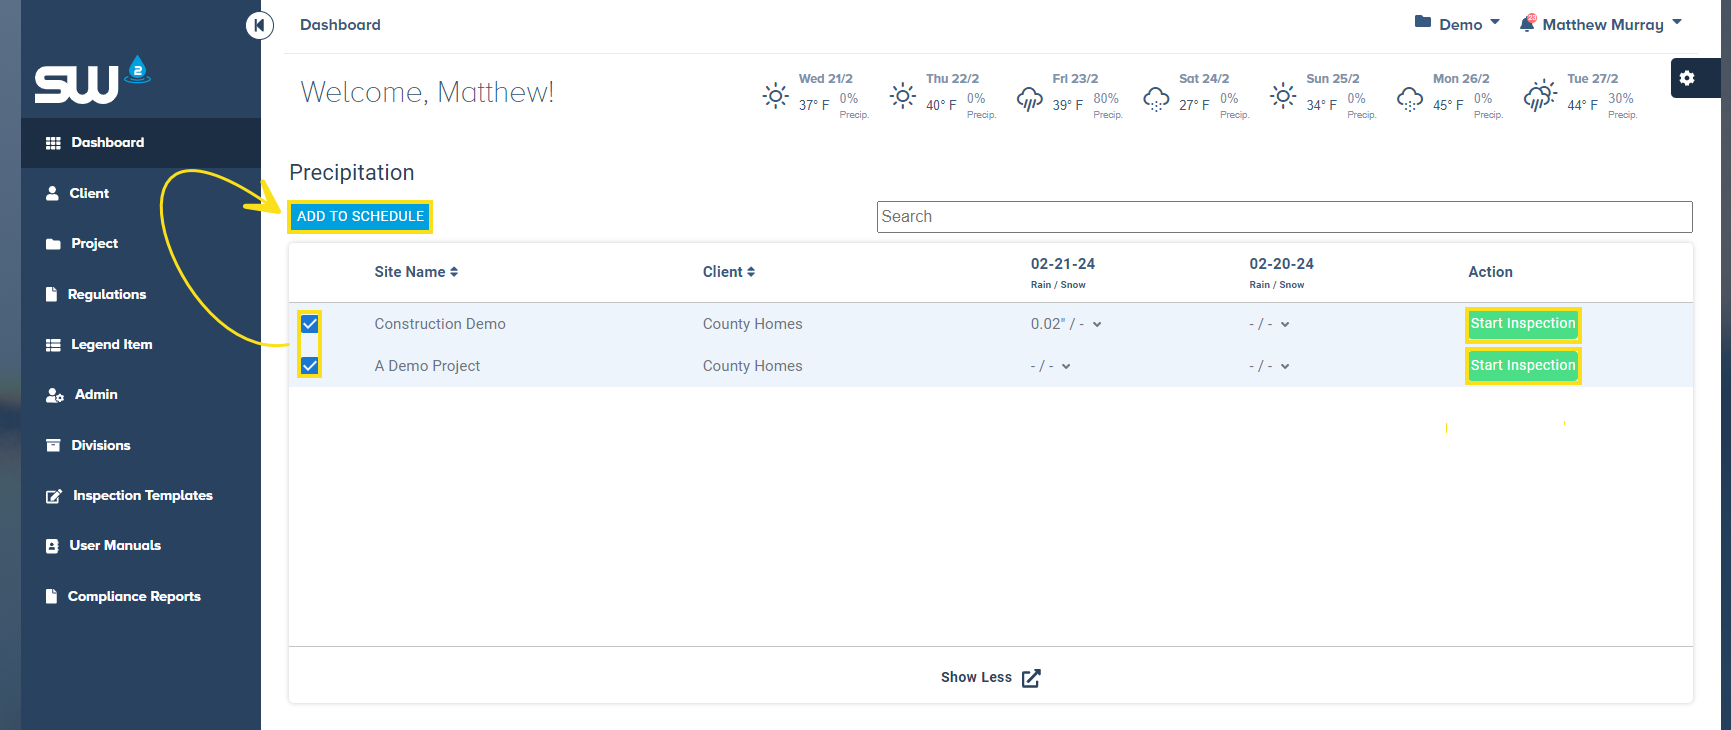
Precipitation
The Precipitation widget lists out all projects that a user has access to and displays precipitation, both rain and snow, accumulation for current day and previous 24 hours which are shown as separate columns. Users can use the search bar to easily search for and isolate projects.
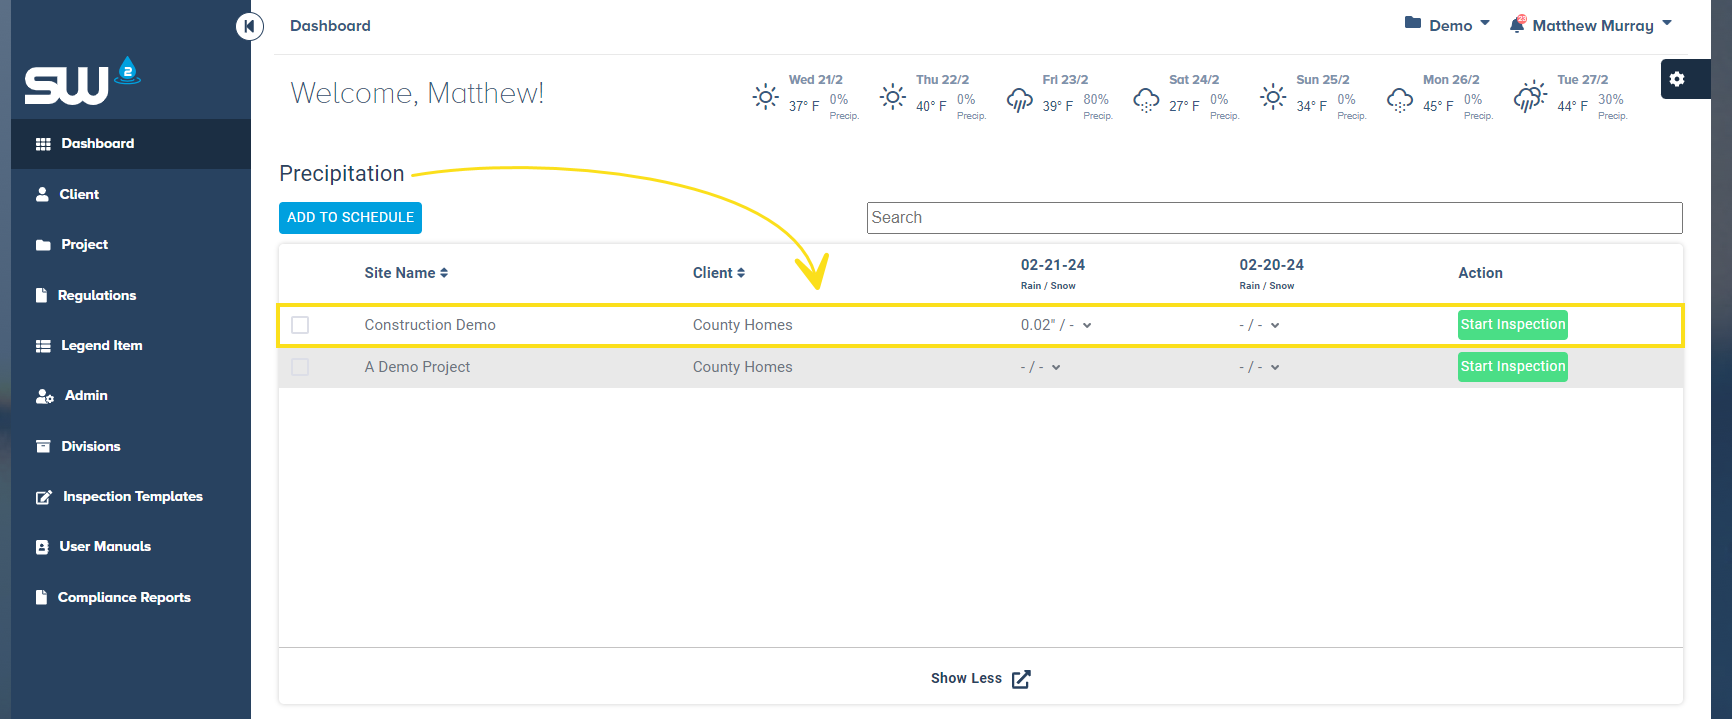
Users can also use the totals drop down to see the breakdown of how much precipitation occurred each out for those days. The hourly totals are added up and displayed.

If totals are meeting the threshold where a precipitation inspection is required, users can click the Start Inspection button to start and submit that report. Additionally user can schedule precipitation inspections by selecting projects from the list and clicking the Add to Schedule button. When a user adds to schedule an inspection is created an will now appear in the My Projects widget as due today.